Sarking Felt (Part 2)

Lapped Sarking felt – Part 2

Bitumen Felt
SAMSUNG CAMERA PICTURES

As building material supplies became more scarce during the housing booms in the 1930’s we saw the growth of the “half-lapped” tile instead of double lapped roof coverings. These tiles appear more stepped. The tiles are not actually half lapped, but only lapped by around 7-10cm or so. Roofs were often quite steeply pitched at that time. The need for underfelt became acute, as wind-driven rain could more easily get between the tiles and into the loft space.

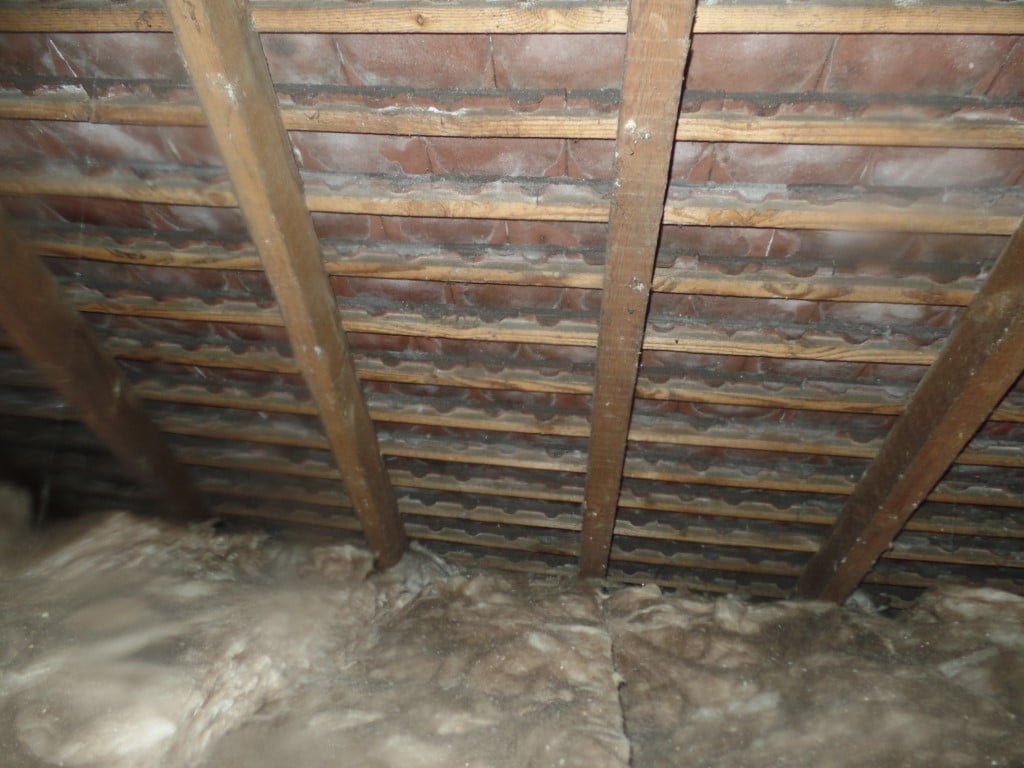
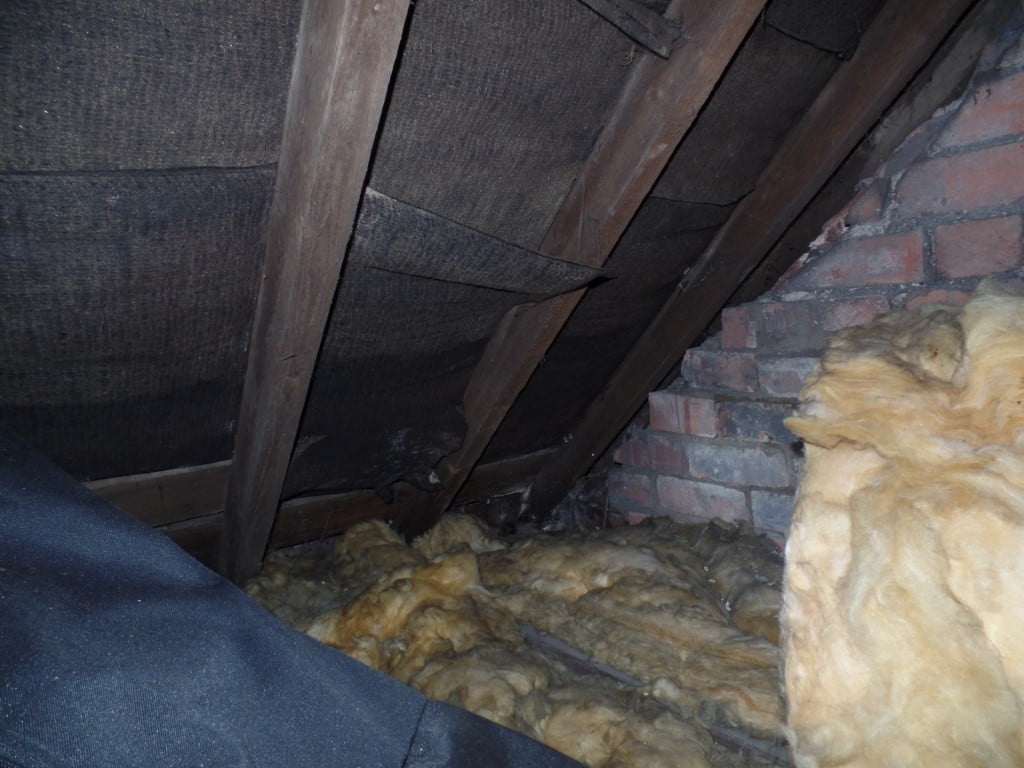
Layers of sarking felt consisting of basic hessian soaked in bitumen were used. The bitumen itself is not UV stable and the hessian rots when wet. This was commonly used for nearly sixty years and is still present in many of the roofs we inspect nowadays. It is evident in older properties: we have all looked up into a loft space and seen the black material draped over the rafters.

What problems does this cause?

Around the eaves, any wind-driven rain that penetrates between the tiles should run down the felt and back into the gutters. The most common failures are when the sarking felt detail along the eves has decayed and rotted away; the rainwater is likely to get into the tops of walls.

The felt does become brittle with age so under wind loadings it tends to rip and tear and fall away, exposing the underside of the tiles. It can aggravate condensation-related issues in roof voids as it is not breathable; this often results in wood boring insect and rot.

There are suggestions that this type of felt requires complete replacement every 25 years or so. We hold the view that often the exposed areas of felt can be replaced around the perimeter of the roof. The presence of bitumen sarking felt does give a good indication of the age of the roof hence its life expectancy. Older Bitumen based sarking felts also sometimes contained Asbestos.

More recent materials

In the 1950’s due to building material shortages, a felt called “SiselKraft” was used. This comprised thick gauge building paper, laminated with a bitumen core. This really only had a maximum life span of 25 years because it simply shredded under wind loading, it is seldom seen now except for the odd piece left in a roof void. It was used extensively on Precast Reinforced Concrete “Cornish” properties and in social housing but has literally fallen away now. 

The trend for roofs with a shallower pitch became common in the 1960’s and 1970’s, with the continued use of concrete tiles. This is when we started to rely on stronger underfelt for protection and not just as a secondary “emergency” layer to keep out dust and leaves. It was still a bitumen base reinforced with string like fibres.  Even a basic rip or tear can allow water penetrating beneath the tiles to get into the ceilings below. Especially in areas with high wind exposure such as on hill sides and anywhere with a good view!

The concrete interlocking tiles usually appear sound from the outside but the stains on the ceilings below will suggest that the felt is past its prime.  Hence even in properties from the 1970’s, we often recommend re-felting with a stronger modern breathable felt.

Sarking Felt (Part1)

Shows a roof with no Sarking felt
SAMSUNG CAMERA PICTURES

Sarking felt or underfelting through time

Keeping the rain and wind out of your attic depends on the pitch of the roof, type of sarking felt, the types of tiles and how those are laid.

When slate was used for roof-coverings in Bristol, these were generally quite thin and they were laid with substantial overlapping. Hence a layer of underfelting was not required – the rain and wind couldn’t penetrate easily.  There were still gaps and some of the earlier roofs were “torched”;  this is where a lime mortar was applied under the tiles. Other than in very old buildings, this is seldom seen now as these roofs have mostly been replaced especially in residential setting.

In some very high quality roofs in Clifton and Southville,  timber sarking boards were used as underlay to slates or tiles;  close fitting timbers were laid beneath the tiles as a secondary layer. This was a very expensive and heavy way of roofing. We do occasionally still see sarking boards and these are quite common in the North where worse weather conditions prevail.

Over the next series of blogs, let’s look at what we do still see regularly.

Around Bristol, there is plenty of clay and this was extracted to produce small rectangular roof tiles. These are sometimes called rosemary, Broseley, biscuit or common tiles. They have been in production, originally hand-made, for around 150 years.

These were very popular around the 1930’s during the housing boom. They were double lapped so formed a tight-fitting seal against the weather. Even if a tile broke or slipped, there was another layer of tiling beneath to keep the water out. Hence an additional layer of underfelt was not usually considered necessary.

If asked about defects with felt, a lot of roofers and older surveyors often respond “They didn’t have felt in the 1930’s houses, so it is not essential!”. What should be remembered is the tile type and that it was fitted as double lapped forming a much better defence against the weather.

How long do these roof coverings last?

Some of these roofs are still serviceable having stood the test of time. The underside of the tiles can be seen from the roof voids and so can the supporting timber battens. Sometimes these break or rot over time but as they are visible, they are fairly easy to inspect.

The photo shows a roof-covering from the 1930’s that is still serviceable some eighty years later. The keen-eyed will spot the insulation pushed into the eaves;  this is not ideal for ventilation purposes although there is much better air flow through this type of roof without felt.

Older texts do suggest that these roofs will have a 90-year life span. Although this one is still in acceptable condition, a surveyor will say it is reaching the end of its useful life simply due to its age. This is when a thorough inspection of the structure is essential. The supporting timbers should be checked for wood boring insect and rot as well as for the nails rusting and general decay.

Easton

Typical street view in Easton BS5
Typical Easton street

Are you looking at Victorian/Edwardian properties in Easton?

We have spent years surveying properties in Easton and the surrounding BS5 postcodes.  Mostly good-sized Victorian or early Edwardian houses, sadly, many suffer from what Martin in the office describes as “the trinity”; roofing, dampness and movement.

There was often a lack of maintenance in this type of property in this area over the years. Some houses have been long term rentals and suffered from chronic underfunding, then were sold off when property prices increased. Sometimes the issues were fairly major and hence were neglected; the maintenance of important parts of the building were ignored. Estate agents used to refer to the customary slanting floors and skewed doors as “Easton Creep”;  in reality this is movement in the building’s structure.

Two decades ago

Around 2000, the area was described as “deprived”; as a result, funding from the EU and Councils poured into the area in the form of grant funding. This was taken up by most home owners as the portion for them to contribute was very small.

This work often included rebuilding chimney stacks, re-roofing and (importantly) replacing undersized roof structures during this re-roofing, rendering the external walls and under-pinning them as required (a lot did) and re-building boundary walls, for example.

The last ten years

In the last 10 years or so this area has seen a massive increase in house prices, with bigger up-swings than in many areas in London. Some of this increase in prices has happened because they have been bought by a diverse selection of people bring new money into the area. Often newcomers quip that it reminds them of London in cultural and structural appearance.

So if you are looking for properties in this area, it is a good idea to seek out one that has had a great deal of the remediation work already carried out, with much of “the trinity” already repaired. You should then find that many of the expensive basic fundamentals of the house have already been sorted out.

From the road, look for matching chimneys that appear in good condition and which have been rebuilt in the last twenty years; this may indicate that the area may well have had grant funding. The biggest clue is the front boundary walls; these again appear more recent and often match along the length of the road, with only one or two being different where the householder did not take up the grant funding.

Besides matching boundary walls and chimneys, most of these houses have concrete roof tiles of a similar colour. Some examples of streets where grant funding was offered are Battersea Road, Stanley Park and Bloy Street.  Maybe have a look at these on Google Earth Streetview, so that you are aware what the rebuilt chimneys and front boundary walls look, to aid your house hunt successfully.

RICS Home Surveys

Why the New Home Surveys Approach?

There have been significant changes in the property market in recent years. Valuation practices by lenders are changing and often no surveyor will visit the property on behalf of a lender where suitable amounts are put up by the purchaser for security. As a result, the Royal Institute of Chartered Surveyors (RICS) has undertaken extensive industry and consumer consultation regarding helping purchasers to take more informed decisions.

Their research suggests that one in four people have purchased a property without having any sort of further survey being carried out – before one of the biggest investments they are ever likely to make!  Another finding was that whilst three-quarters of the people did have a survey carried out, they did not know what type of survey they had commissioned. From our experience, we would suggest that some of this confusion is because the current RICS templates for their Level 2 (“Homebuyers”) and Level 3 (“Building Survey”) offerings look very much alike; they take a similar approach to how they report, for example using traffic light systems.

Due to our high levels of personal referrals and on-line reviews, we know that this does not apply to the premium service we have offered – our Signature Building Survey. This is comparable with the RICS Level 3 report but includes roof survey and feedback, certainly far more than the Level 2 “Homebuyers”.

What we are doing to comply with the revised RICS standards?

We have attended the RICS CPD and training events which seem to focus on making sure the customer has informed choices.  

Hence in order to keep our RICS regulated status, we must now develop a wider approach, moving away from offering solely our “we will do the best we physically can” signature Full Building Survey; most of our reviews and testimonials relate to this. We will in future also be offering the RICS Level 2 and 3 surveys and our client services team will spend more time discussing with the potential client what survey is right for them.

The RICS Standards changes will take place in June 2020. We are looking to start using the RICS templates and set wording as prescribed by the new Home Survey Standard when requested by a client.  Our tried and tested methodology of our signature Full Building Survey will continue to be offered but in addition we will also offer the RICS Level 2 Homebuyers report and the RICS standard Level 3 Building Survey. The client will be able to decide what survey is right for their circumstances. In the past, we have simply declined to undertake the Level 2 reports and sent our enquirers to other surveyors offering this service; however we are now looking to offer this to our clients during the initial telephone call or email, explaining their options.

What this will mean to our returning Clients

Our next series of Blogs will outline the differences and explain what to expect from our broadened service offering.

The demand for our Signature Full Building Surveys has often outstripped our resources over the years;  Principal Surveyor Jon Holloway and independent Surveyor Bruce Marfell are normally booked heavily in advance.

So that we can still offer acceptable lead-times with our wider provision, we have asked another Surveyor experienced in delivering these standardised reports to help provide the RICS standard surveys, as are offered by most of our competition.  These Level 2 and Level 3 templates have the RICS branding on them and are in a tabular format, not a true written report, and will adhere to the basic formats as laid down by the RICS, no more, no less. But the client will now be given the opportunity to decide for themselves which level of survey is right for them, out of our three pre-purchase options – rather than just “we only provide our Full Building Survey”!

What about that Loft Space

Loft space

In an earlier blog, we’ve already dealt with ‘Loft Rooms’, the conversion (successful or otherwise) of the attic to habitable space. But if this is not a feature of the property you are considering purchasing, you may not be giving much though to the loft space. It seems a minor matter compared to possible structural movement, roof condition, dampness or the presence of asbestos. However, usable loft space is great for storage of those items you only use occasionally, the artificial Christmas tree and decorations, the inflatable swimming pool, the holiday suitcases…

In our reports, we comment on access and boarding in the loft space, as well as the insulation present and the condition of the rafters.  For example, “there was no loft ladder, boarding or lighting provision”. This is comment is often skim-read by the client who then files it away for later, or ignores it.

However, on Facebook recently we were asked to comment on the supply and fitting of loft boarding and a loft ladder for £810.00 –  was this a good deal?

What are the options?

  • Boarding

To supply and fit a layer of chipboard flooring, normally we would suggest around £25/m2.  This is for smaller areas, say a room where more cuts and noggins and gluing down the overlapping edges will be required. A loft space on a small house can easily be 40m2 then this adds up – say £1000.00.

  • Loft Ladders

Then you start looking at the many different types of loft ladder – metal or timber, with folding or sliding variants – and the choice starts to become bewildering.  Since loft ladders are seldom used even if they are in place, you may forget how to operate them. They can be rather dangerous! Many types drop or slide uncontrollably when you open the loft hatch and hence you risk them hitting you. Some of the locks or catches do not always engage correctly as we know to our peril. One surveyor almost lost his toe when a catch failed on the loft ladder and the guillotine action caused a rather painful few weeks of hobbling around. Cost? From £80 to over £300 for a super deluxe wooden model.

  • Hatches

Modern loft hatches have draught-proofing and in-built insulation, or may simply be a hinged timber board. We often look around the loft hatches for signs of wood boring insect . These prefer damper timber which is often caused by moisture-laden air escaping around the hatch and condensing on the surfaces. Hence some draught proofing is advisable. Some older loft hatches incorporated asbestos cement sheeting in their construction, hence incurring increased removal costs.

Weight Loading

The other issue is one of weight loading. The TRADA tables suggest that when the roof design is calculated, there are no significant weights in the loft space (the odd plastic Christmas tree aside). However, when the loft is boarded out this will increase the deadload on the ceiling joists, even before we have started to store the seldom-used artefacts. In a RICS building survey at a small house in Clifton, the ceilings were noticeably cracking. The vendor pointed this out to us, saying it was just his luck that as he put his house on the market the ceilings had started to crack. Inspection of the loft void found that in an attempt to clear the habitable areas to make the property look attractive, he had put a huge amount of contents in the loft void. This included a weights bench and set of weights. Needless to say, this had an adverse effect on the ceiling joists below and the plaster attached to them.

So simply boarding the loft can become a rather complex project. The short comment that we use to describe access and boarding in the space may suddenly have a significant cost implication well in excess of that £810.

More about Windows

Misty window
Misty Window

A typical line in a RICS Homebuyers’ report is “Several windows were difficult to open and will require some maintenance and repair, especially to hinges. Some gaskets/seals are detached. Two window units at least have failed and will need replacing. Have a competent contractor quote for all works before exchange.”  

The cost of replacing windows in an average three-bedroom house is around £500 for each window, depending on the contractor you use. So you really need to understand the actual extent of the issues with each and every window, in detail.  

We have talked about the types of window in our previous blog https://www.domesticsurveys.co.uk/2017/03/09/windows-doors/

And as part of inspecting each window, we look at the toughened nature and e-coating present (or absent!) on the glass, as described in that blog. Now we are going to look in more detail at the window frames.

UPVC Frames

The basic UPVC window frame is obviously the most common type. The opening parts are called the casements. We always attempt to open and close them individually, unless they are locked and no key is readily available. On older windows, the casements do not always close correctly into the frame and leave a gap between the casement and frame. This can cause draughts as well as possible security issues.

Strengthened frames

When replacing older windows in (say) bay windows for example, the original window frames often provided support to the masonry above. We have seen many properties where lightweight UPVC windows have replaced these older stronger frames.  This has caused the masonry to sag or the windows to bow; this is very common. Using steel strengthened windows – where a steel frame is pre-moulded in the UPVC to add strength – is a very small extra cost.  However, this is rarely specified as they can be slightly harder to fit and would therefore cost a little more. So in the competitive world of double glazing sales, the sales person will often omit them as an option.

Whilst working for insurance companies on subsidence claims and the instruction says “cracks around the bay”, the first question we ask is when were the windows replaced. Installing window frames that cannot support the masonry adequately is usually the reason for the cracking.

Trickle Vents

Another thing that is often omitted is trickle vents, gaps cut through the frame. Perhaps you are thinking that you are buying “A”rated windows then considering cutting a hole in them!! However, newer windows are often replacing older windows which do allow some levels of ventilation. Modern window openings are normally fitted with a two stage setting. This allows them to be locked for security reasons but still remain slightly open, allowing for essential ventilation of the property.

Beading

When the glass is fitted into the casement or fixed part of the frame, a mitred plastic strip is pushed into place to the hold the glass in position. This is called the beading. Older windows were often externally beaded. This is not ideal from a security perspective. An enterprising burglar can use a steel ruler to pop off the beading and remove the glass pane. He can then gain entry inside without making too much noise.

But if the panes do blow (internal misting) then they can only be removed externally – which is costly on a three-storey property. Now windows are internally beaded to make maintenance easier and also to improve security.

What’s a Desk-top Survey!

So you’ve found that dream property and you are really excited about it! Before you launch into making an offer, there are things it is worth checking yourself. In our first ever blog, we urged you to take advantage of free resources on offer and conduct your own desk-top research. First, look in the British Coal Mining Archives to find out whether there are mines below your prospective home that could cause expensive subsidence. Next, go to the Environment Agency website to check for the likelihood of flooding with its implications for insurance cover. Yes, even for new-build properties !

What more do we do?

Generations of surveyors have commented in reports that they do no research into the environmental or geographical locations of the properties that they survey. This has been left to the Legal Adviser to undertake. When most property conveyancing was done by a local solicitor who probably even knew the road, that was fine.

However, nowadays conveyancing a property can be done from anywhere. Hence the Legal Adviser may not know the geography or even the relevance of some of the surveyor’s comments, so cannot adequately advise their client. This was recently highlighted in an RICS CPD roadshow –  the swallow/sink holes in a roadway could have been spotted with some desktop work by the surveyor.

Our watchwords are “always use a local Surveyor”!  They know the vernacular style of the buildings and the likely environmental issues of the areas in which they work. As part of our professional indemnity insurance, we must not undertake more than 25% of our work outside a 25-mile radius.

Historical Map data

We start with historical map data, which provides brilliant insight into when the property was constructed. This indicates the original materials that would have been used and the style in which it was built. This is particularly useful if it happens to be a ‘listed building’, designated of special interest by Historic England. If it (or an attached property) is listed (check the Listed Buildings website!), it should be maintained in the same condition as when it was listed. So you can’t just rip out those draughty wooden sash windows and replace them with UPVC double glazing! You will need Planning Consent for any such proposed alterations. The maps can show the shape of the structure over successive decades – is that an extension or original to the building?

Map data also shows what was on the site prior to the house being built. This can indicate the geology to some extent. In Bristol for example there were numerous clay pits, which would have been back filled. Was one beneath your prospective home? If so, were the workings deep and what were they back filled with? These are not shown on traditional coal mining reports but can still cause subsidence.

Aerial imagery

When we think of aerial imagery, we immediate think of Google Earth.  This is great resource and normally you can find images in Bristol dating back to 2012. You can see what has been altered recently and view the condition of flat roofing over the years.

There are also on-line aerial images dating back to 1946 which clearly show bomb damage to some houses we have surveyed in the past. One property appeared to be genuine Edwardian. We checked the on-line images. Then we were able to tell the client that it had been completely rebuilt in the 1950s and it was demolished due to bomb damage in the war.

The Environment Agency

This is an excellent source of free information. The website shows flooding from rivers and seas and also the likelihood of surface water flooding. This was a driver of the Hull floods and happens in the most unlikely of places, even on hillsides. They also map potential floods from reservoirs which is important given the recent issues with Toddbrook Reservoir. And if the property is located in a flood-plain, you may have difficulty in obtaining buildings insurance cover. This is worth considering as our weather seems to be getting more violently stormy.

British Coal Mining Archives

This is a free resource that will tell you if the property is located in a mine reporting area where a further CON 29 mining search would be recommended. Subsidence can be very costly and again, be detrimental to your insurance cover.

The Council

Many councils run their own mapping service. Is the property in a Conservation Area? If so, there will be restrictions on what you and your neighbours can do. The Bristol maps show some of the bombing raids.  In Bath they even give refuse collection dates!

Land Registry

You can often find out what the property was last sold for via zoopla.  You can also find out from the Land Registry for £3, as long as the date was in the last twenty years. This search will also tell you the name of the owner(s) which may be useful for leasehold/managed apartments. Details of boundaries etc are also available although for a small fee; your Legal Adviser should advise on these.

Do It Yourself?

We think our desktop work is amongst the best around. You can do it most of it yourself but it takes time and some interpretation to produce comprehensive, accurate information. We will happily do it for you as part of our Building Survey product. It can save you heartache and money if this is done in the early stages, before you run up substantial legal fees.

Window Sills

Window sills are not just decorative – nor are they simply supports for window boxes!

They contribute an important weather-proofing function to the building. They should be designed to shed rainwater away from the wall. This prevents it penetrating into the wall beneath the window frame. However, to do this, the sills must be well sealed into the wall. The window frame should also be well sealed around the edges.

Stone Sills

Traditionally in stone built and Victorian era housing, stone was used for the sills. In Bristol this was normally oolitic limestone on front elevations, “Bath stone”. Sometimes other types of stone were used, such as in Kingswood were Basalt type stone is seen. These sills lasted well when regularly painted with a lime wash or breathable paint to act as a sacrificial barrier.  Now however we often see them painted with non-breathable masonry paints. This traps moisture in the stone causing them to delaminate, which is very sad sight to see, these elements seem often forget even in the grander properties that we survey.

Concrete Sills

We have seen many dampness issues where the window sills have been rendered over or around and this has caused damp to penetrate through the walls beneath. Defects in sills can allow dampness to creep in as in this case – watch our video.

The underside of this concrete sill has a throated capillary drip like a groove cut into the underside of the sill to help prevent water running back under the sill and into the walls below the window sill;

In buildings constructed in the 1930’s and 1950’s metal reinforced concrete became popular. Due to the composition of the concrete, a chemical change occurs over time; the embedded metal will then rust. This causes the sills to be blown apart, as can be seen below. This is not uncommon hence we look for any straight-line cracks on concrete windows sills, which indicates the condition of the metal reinforcements.  The best method of repair is to cut out and replace such damaged sills.

UPVC Sills and Cladding

UPVC windows normally include the option of a light weight extruded UPVC sill which finishes the window in a matching colour.  Cladding can also be used – but in the case below in Highbridge near Burnham, the UPVC has been clad over a decayed timber sill. This is clearly not ideal! The timber should have been cut out and a new extruded UPVC sill installed, which would have been fairly easy as the timber is so rotten…

Lintels

Out of sight, out of mind?!  Basically, lintels are designed to support the structure above window and door openings. They are structurally extremely important. But they are often hidden, concealed by render or within brick-work or stone-work.

So here is a brief guide to a few common ones of which to be aware.

In olden times

The original lintel was a piece of timber cut to fit each opening. These are still readily visible in many ancient properties and have lasted for centuries. However, as timber is a natural material, it is elastic and will sometimes bow over time. It may sag under the loads imposed on it. It can also prove problematic in damp situations such as when hidden behind cracked render which has let the rain through. It can suffer from decay and from wood boring insect attack.

An example of a hidden timber lintel can be seen on this Grade ll listed building in Henbury which we surveyed this year:

Wooden Lintels

Timber is still used for “lintels” in modern timber framed houses, albeit with a lot more structural calculations and tested timbers than in earlier centuries!

Victorian era

In Victorian times the brick ‘soldier arch’ was introduced as a more decorative finish. A flat horizontal row of bricks on end (standing to attention’ like soldiers!)  supported the masonry above. However, after a hundred or so years in place, these have often slipped and allowed the masonry above to drop. Sometimes this is due to deterioration of the mortar or from settlement or movement in the building. Sometimes the row of bricks can push outwards, which is called “arch thrust”.  When the soldier bricks loosen, little is bonding the brickwork in place. Hence it is imperative that this is remedied quickly, as the bricks can fall and present a hazard.

On the internal face of the wall,timber continued to be used and is normally hidden by plaster, but it suffers the same issues as described above.

1920 and 30s

Then in the 1920/30’S we started to use concrete lintels pre-stressed with internal metal reinforcement. Carbonation may cause these to fail; this is the carbon dioxide in the atmosphere reacting with the calcium hydroxide in the cement. However, most are still fully operational and are not suffering at all.

In the picture below, one has been exposed due to a damp issue:

Concrete Lintels

1930 to 1950s

Then in the 1930/50’s era, some properties did away with them completely; the window frame was used to support the external leaf of masonry. This did not bode well, as when windows were changed, the chunkier more solid metal or timber frames were replaced with modern lightweight plastic/UPVC. The removal of the original support caused the brickwork above to drop as the new frames bowed. And if the masonry was not properly supported during the replacement of the windows, then the masonry was also likely to drop.

An example of loosened masonry is shown along the brick on edge course in a 1930’s property we surveyed in Knowle this year:

Masonry Lintels

1960s

In the 60’s we designed the cantilevered boot lintel, which was apparently intended to be more aesthetically pleasing. The ‘boot’ section protrudes to the outside of the building; the outer ends of the lintel are not built into the brickwork on either side. One is shown in the picture below. As they were cantilevered and the protruding “toe” of the boot is not supported, they have a tendency to rotate. This causes cracking above the lintel, mainly internally, and stress on the window frames.

The below picture was taken in Patchway in South Gloucestershire on a survey this year.

Boot Lintels

Nowadays

Then we started to use metal lintels. You have probably heard these called Catnic lintels which is the brand name like Hoover for a vacuum cleaner. They began as basic L shapes at first then came box lintels. These normally incorporate a cavity tray to deflect rain back to the outside or even damp proof courses and in built insulation, but that will be the subject of another blog.

An example of a box lintel is shown in a garage on a survey carried out this year in a property constructed in the 1980’s:

Box Lintels

Why not buy a former council house?

WDB5 Council house
Former council house

Why not buy a former council house?

Often RICS valuers will comment that there is a negative effect of a property being an ex-local authority house. We tend to take a different view. You can get very good value for money because ex-council houses are often solidly built and in convenient locations.

The residents on such estates have often lived there for long periods of time. Many may have purchased their houses under the Right to Buy scheme. If you can see that the properties on an estate vary significantly in the details, probably the right to buy has been exercised frequently!  For instance, look for changed window openings, roof coverings of a different style, render being applied to brick faced buildings and extensions being added.

Financial considerations

You can often buy such properties at a discount. However, be aware of an element of risk with regards to ex local authority housing that has purchased under Right to Buy. Your solicitor should check on potential buy-back arrangements or the correct time-period having elapsed between purchase from the Local Authority and the period within which there is no claw back on the price.

Designs and Acronyms

1920s Stock

Local authority properties constructed before the Second World War are often well-built and to an exact design such as the early 1920’s REA25s.  These were built in Seamills, Bedminster and Hillfields.  They were built in terraces of four houses, often with an alleyway through the middle; they have hipped roofs at each end.  A similar design is the BOA25s. These styles led the way in council housing in Bristol, designed and built by the Local Authority.

The later Bristol-designed WSA2 makes up some of the 1920’s housing stock; they are readily recognisable and found in large numbers in Shirehampton and Hillfields. These normally have a large open plan Kitchen and an open plan Lounge running front to back.

1930s Stock

In the 1930’s the WDB5 made up a large proportion of the council housing stock. These are found in Southmead, Horfield, Bedminster and Knowle, and tend to front the wider roads in the area. They were called ‘parlour houses’ as they had a separate front parlour or snug, normally later used as a Dining Room. They were also equipped with small cupboards and had a coal shed on the ground floor running from side to side across the back. The small cupboards and parlour walls created fussy little rooms; these have normally been removed and large open plan lounges and kitchen-diners created.

In the later 1930’s a collaboration between two architects created the HBA2 on council estates in Horfield and St Annes Park. These were fairly common and had a touch of flair – the four-house terraces are completed with a dutch gable type front with sloping eaves. These are becoming very popular due to their large gardens and close proximity to Gloucester Road. The valley roof constructions of this type of flared gable front can suffer from water ingress issues. However these are relatively easy to fix and once done correctly can give many years of trouble-free service.

More Acronyms

We have only touched on the extent of pre Second World War council housing around Bristol. There are many other codes that the design departments used to refer to their houses such as the A2, CEA2, D5, CNH25 and HBB2. These were normally abbreviated from the original designer’s initials. There were other speciality designs such as the “aged couples flats”.This terminology may not be politically correct nowadays, but is a reminder of a bygone era.

.